Making a Personal Website Home Page
Don’t re-invent the wheel. There are plenty of online tutorials. Use them for extra help! This step-by-step guide is for Windows users! - Though the website side of things is common for Apple Mac users.
Step 1
Does your ISP (Internet provider company) provide a domain name? If not, you need a company to register an internet name eg www.myname.com. Look for cheap companies that will charge you perhaps $7.50 (about £5) per every two years. ISP names may include their web address eg
www. myname. usaonline.com
It takes two weeks for a new personal web address to be usable, and at least an extra week additionally if another company hosts the web address. Registering a web address is with a web registry company. Hosting the address is a where a company stores your uploaded web pages and images, and makes the page contents available Internet-wide. Hence these steps need doing well in advance! Many companies will both register your web address and host the uploaded website. in other cases and where you can't use your ISP two companies may be needed!
Step 2
The registering company will usually host your site on a server or have links to another company to make it available across the Internet, but will charge (about $15/ £10 a month) extra for this. It is cheaper and easier if your ISP company provides this service. Most do, though some have smaller web site storage space. If you can’t find simple info on your ISP website, give their customer service a call.
Some ISPs will also host a domain name you have registered elsewhere. Not all do this though.
Step 3
Although web pages ‘can’ be written in any text editor, a good knowledge of HTML coding is needed, which is why most people either use a web template program, or a web page editor program such as DreamWeaver that displays the page graphically more or less (!) as it would appear on a webpage.
There are some fairly cheap programs of both types. The top-end programs like Dreamweaver have extra features. Web template programs are more likely to be restricted as to what you can achieve depending on the templates available. Web page editor programs need a much deeper knowledge of how web pages and a web site is set up and how to manage various pages and content.
Both types of program usually have an upload feature, you’ll need the ftp address of the server (obtained from the ISP or hosting company), your host account name, your host user password, and the name of the upload folder on their server.
Step 4
Now you know the practicalities (and cost!), you can start to write content, either on paper or preferably on a word processor. You should aim for a maximum of three pages of text per web page, so visitors don’t have too much text to scroll per page.
Save any pictures you want to use in a separate folder, preferably called images. Check that pictures and graphics are free to use for personal use and not copyright protected. This is less of a problem on a personal webpage. Businesses often have to pay to use pictures on their websites, or use photos they have taken themselves.
Step 5
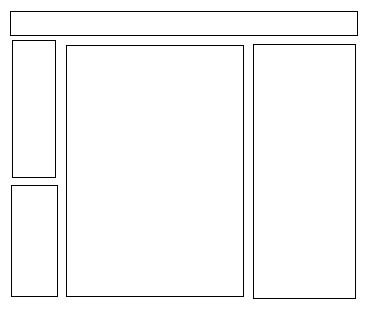
If you aren’t using templates, sketch page layouts for each page showing where you want menus, pictures, headings and text. Use ideas from existing websites!
You can also view the page source code content for many web pages online to see how some things are done!
Step 6
If you have more than one page, you need a sketch or sketches showing how the pages link to each other. The first page is ALWAYS called index.html, or index.htm. This is so the web server knows which page to display on entering the website. Give each other page a meaningful (to you!) name.
Images should be stored in a folder called images.
Step 7
If you are using a web editor program, set up a folder in ‘My Documents’ called something you can recognise such as MyName Website. Copy the images folder into this folder. Each of your web pages will be stored here too, including of course your home page the index page.
If you use a web template program it may have its own storage area depending on where it is installed, or it may ask you where to store the files. Please note that most template programs have their own unique file storage extension, which cannot be opened in other such programs or in a web editor program. It is possible though to save pages separately direct from the website once it is up and running if you want to edit any of these manually, regardless of any proprietary formats used to construct the pages.
Step 8 (for web editor programs)
Each web page has TWO descriptors, the title which is displayed, and the page name that it is saved under. You’ll note the page name saved as after the main site address in the browser address line. It is simplest to use the same name for the title and page save name for most pages!
Content in web pages is either held in tables - or CSS boxes (which are more complicated to learn!).
Learn how to use tables. You can use separate tables for headers, holding text, pictures and menus. Simply drag each table to the size needed, having selected where to put it (starting from top left corner). Example table layout
Tables hold content in a particular way. There’s a left/ right or middle setting and a top / down or halfway down setting. Pictures will only be in one of these placings, so size and placing of tables is important in picture layout. Again the same applies for header or title placement, and for text content.
It is sometimes found that even using accurate table placement, that spaces need to be manually added to code for it to display exactly as you want it to on the actual web pages. Web editor programs get it right most - but Not all of the time! You can use (and will probably need to!) spaces to line up text in lists or menus, and for accurate title or picture alignment. You 'may' be able to type in spaces on the design page, but for text only one typed space is allowed, so copy and paste spaces from your word processor!
When adding text from a word processor, select all, copy, then use paste special into the web page. This retains font, font colour and formatting information.
If you don’t know any other HTML code at least learn or write down the code for a space, which is
A quirk of HTML coding is that you may need to use this up to several times per ‘space’ on the page. It can be used multiple times eg - or copy and 'paste special' spaces from text!
Just change to the code view tag and copy and paste into the line of code shown (where you placed the cursor on the design page). Click back on the design view tag, save the page and use the program facility to open the web page locally from your hard drive to view the changes. ‘Put’ the revised page uploaded to the server when you are satisfied with the changes, remembering to refresh the page in your browser!
For more than one page, hyperlinks need to be set up to each new page. These are text which has been set up to act as an active link when online. The hyperlinks have to use the exact named page format. If a page is called flower.html a link set to flower.htm would not work. The link and saved name have to be identical!
Several pages can be linked simply inline, eg index links to page A, page A links to page B etc. It is usual to have a link to the home page on every page.
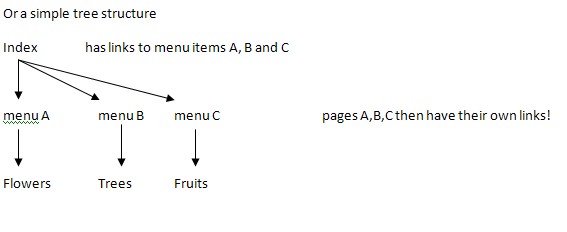
Where there are quite a few pages or more on the website, a Site Map page is a good idea, with an alphabetical list of pages each with a link to the page listed. If the page title in the menu has a different name to the name a page is saved as, care is needed!
You’ll need to test each link online, to make sure it works and calls the correct page!
It is a good idea to get acquainted with an FTP program. It can happen that your web template program or web editor program refuses to get online, maybe needing reinstalling. At least with FTP you can then manually sort things in the meantime. CoreFTP is excellent, free and fairly easy to use. An FTP program needs the ftp address of the server (obtained from the ISP or hosting company), your host account name, your host user password, and the name of the upload folder on their server, same as for your other program.
Step 9
OK, you’ve saved a few pages, set up links etc with your web template or web editor program, and input the correct details to log on. Next you upload (usually called ‘put’) the pages to the web server, and hold your breath! After a few minutes or so, open your web browser and type in the address of your webpage, eg www.myname.com and if all has been sorted correctly, your website is displayed and better still if links to other pages work! In practice, the web pages may be viewable seconds after uploading, but you probably need a cuppa to steel your nerves first!
We assume then that your ISP or web hosting company has confirmed that your server they provide is ready to accept uploads. (If you’ve had to or chosen to use a new registered domain name, it can take up to two weeks for the Internet site name register (used to direct to web pages internet wide) to ratify the new web site name and update server details across different countries worldwide!), plus at least another week for the hosting company to set up a folder for you on their server to the Internet.
If it won’t upload, you have probably got one (or more!) of the ftp address of the server (obtained from the ISP or hosting company), your host account name, your host user password, or the name of the upload folder on their server -wrong. Also check that your browser is working to be sure you have an active internet connection!
If the home page is displayed, but page links don’t work, you’ll need to go back to your web editor program and correct incorrectly set links, resave the pages and re-put them to upload to the server, and retest online in your browser, refreshing/ reloading the page.
If your home page isn’t viewable online, have you typed the web address correctly, including the www. and not put commas instead of full stops in the address? Spelt correctly? No Spaces in the web address? You can use spaces in linked pages names if you wish within your website, but NOT for the index page name!
Step 10
Meta descriptions and Meta keywords. No this isn’t swearing! You put lines of code into each web page coding after the title eg
<meta name="description" content="myname personal home page website describing my interests" />
<meta name="keywords" content="links to cameras, photography, pictures">
Use keywords of your own choice, and a suitable SHORT description that both ACCURATELY reflects the page content.
Change JUST these bits to suit myname personal home page website describing my interests
and cameras, photography, pictures with more (or less!) keywords up to 10 max keywords
Everything else has to stay exactly as typed, to work
Why would you want to do this? So search engines eg Google will in time list your page in their listings.
1. Don’t pay ANY companies, EVER who state they can get you listed with the major search providers
-they CAN’T!
2. Have patience, plenty of patience. It can take upwards of 6 months to a year for Google for instance
to include your homepage and other pages.
The reason it takes quite a while is that many new sites fold in days, weeks, months, so the big search companies don’t want to list sites that are not well-established. No personal slights intended!
Also the search engines scan the pages content AND descriptions and keywords to see that they MATCH. So it’s no good putting too many keywords, or words like Viagra that are irrelevant to your web

page content just in the hope of getting more hits (visits) to your webpage.
Step 11
Now all you need is some visitors to your website. Tell all your friends and relatives! Over time you MAY get other visitors, just remember that the Internet is one huge place with a LOT of side streets, minor roads and cul-de-sacs, millions upon millions of sites in fact!
Do visit your own website, often! to check it is working, to admire it and to review it! Any problems and you may need to re-upload the pages and images folder to the web server. They are supposed(!) to have back-up servers, but at worst could lose some or all of your data. Infections with iframe viruses on the server are also possible which need your immediate attention, as your site would be blocked then by many visitors anti-virus programs, until you re-upload everything!
Step 12
A few points to remember.
KEEP a backup of all the web pages and dependent files (eg images) in a separate folder/ hard drive. You can always revert to these then if you 'accidentally' save mistakes, or wish to discard saved changes/ go back to the previous version.
When you make changes - Save the changes, Put the revised pages up to the server and then Refresh the page in the browser! You'll do this often if you make any changes!
You normally only need to upload dependent files the first time the page is uploaded, unless you have changed any of these as well.
It is usually quite easy to add content to a web page but redesigns (except sometimes for changing templates with a web template program) usually carry a HEFTY amount of work. It is far better to try to get it right first time!
Keep background colours to pastel choices to make text easy to read. Bold text often stands out better with a coloured background. Pictures which have been lightened considerably and perhaps partly washed out can be sometimes used as web page backgrounds but do check text is legible and easy to read and that some text is not obscured.
Black text on white background is easiest to read!
Do Spellcheck pages, and make sure all links within the website work and that external links work too!
Avoid flashing pictures/ flashing backgrounds and constant music or sound effects. Nothing wears on the nerves quite as much, except illegible text!
Avoid trying to use Java script eg menu drop down list items unless you are sure you have the skill to debug these and make them work!
Don’t rename saved pages unless you are prepared to rework links to match!
Lastly, It is really quite easy to set pictures/ clip art as links.
Visit http://nur.ph/ if you want to put a chat link on your webpage. Enter your website address and set up the code generated as a link. This chat link requires a Twitter account for each participant to chat live!
Alternatively, - rather than chat, This script places a Twitter widget directly on the page, when set in the code page.
<script src="http://widgets.twimg.com/j/2/widget.js"></script>
<script>
new TWTR.Widget({
version: 2,
type: 'profile',
rpp: 4,
interval: 6000,
width: 250,
height: 300,
theme: {
shell: {
background: '#333333',
color: '#ffffff'
},
tweets: {
background: '#000000',
color: '#ffffff',
links: '#4aed05'
}
},
features: {
scrollbar: false,
loop: false,
live: false,
hashtags: true,
timestamp: true,
avatars: false,
behavior: 'all'
}
}).render().setUser('myaccountname').start();
</script>Replace myaccountname with your Twitter user account name. You may need to experiment with where in the page code this script goes to get it to work.
Finally, have fun and enjoy increasing your web design and web coding skills over time!!!!
Business sites are best done using a company that will also build your site and host it but of course are comparatively much more expensive! LCN at lcn.com will let you try out an online shop for the first month free and are very competitive.